The Weekend Dish – Easy Applesauce

5U5A6047

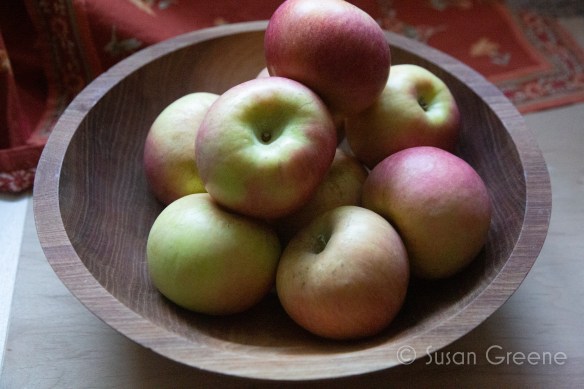
It’s apple season! I don’t know about you but this time of year finds me craving apples, in all their forms: raw, baked, pureed and pie too. Applesauce is a dish that is so much better prepared at home. Although, sometimes the convenience of the store bought variety wins out over the time it takes to prepare. But now that I have found this recipe, inspired by one of Julia Child’s recipes by the way, I have no excuse to buy applesauce instead of making from scratch, ever again! The apples don’t even need peeling and there’s no added sugar either. That’s a plus, plus in my book. There’s one more added bonus – your house will be filled with a glorious cinnamon scent.

I like to have a little fun (to me) photographing the patterns in foods, and apples also lend themselves as incredible subjects.

5U5A6067

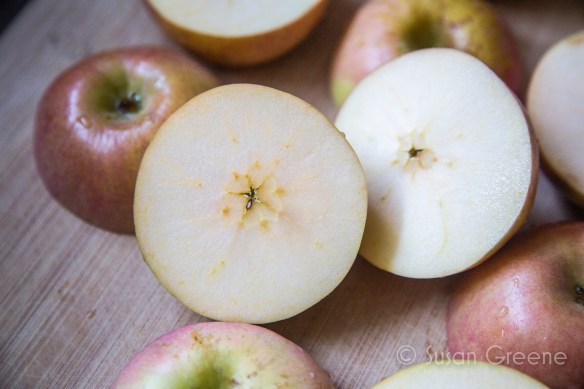
The stars created when cutting apples laterally weren’t very prominent in these Fujis so I had some pattern creation fun.

5U5A6064

To the recipe:

Applesauce

  • 4 pounds of apples any combination, or all of one type, I used Fuji (since the skin is left on, I opted for organic) rinsed and cut into eighths, cut off the core and seeds
  • 1/2 teaspoon cinnamon
  • 2 tablespoon lemon juice
  • 1 teaspoon vanilla extract
  • pinch of salt

Combine all the ingredients in a large heavy pot with 1/4 cup water. Cover and cook over medium-low heat, stirring occasionally – adding more water if seeming to get dry – until apples are soft and falling apart, 35-45 minutes. Uncover and let cool slightly.

Put cooked apples into a food processor or blender and whir until smooth. If it seems too dry, a bit of water can be added at this point as well.

There you go, ready to be enjoyed!

5U5A6079

I like it warm or cool and accompanied by meats, fish or oatmeal, even ice cream. It’s also great on Greek yogurt for breakfast.

Enjoy ~

Susan


Citrus and Sizzle

Today’s August Break 2015 prompt is “citrus” and the photo comes courtesy of Susan Greene, the other original Backyard Sisters. _MG_0380One stifling afternoon, Susan’s daughter wondered what would happen if you added jalapeño to lemonade. Her kitchen curiousity inspired this refreshing and slightly spicy, hot yet cold, beverage. It’s a wonderful anomaly, so delicious it earned a spot in the Backyard Sisters family cookbook. 

For the complete recipe, check out Susan’s post: The Weekend Dish, Jalapeño Lemonade.  For more “citrus” images from The August Break project, search #augustbreak2015 on Instagram, Facebook, and Flickr.

Cheers!

The Weekend Dish – Avocado, Cilantro, Cashew Cups

Avocado, cilantro, cashew cupsInspired by the avocado egg rolls at the Cheesecake Factory restaurant, I headed to the kitchen to see what I could come up with to achieve similar flavors and textures at home. They are a mixture of crispy outside and creamy inside all dipped in a tangy and sweet sauce – a delicious treat. It takes great restraint to keep me from drinking the dipping sauce on it’s own. Wanting the crunchiness of the outside but not the greasiness and mess of frying, I decided to use wonton wrappers and bake them until crispy.

Avocado, cilantro, cashew cupsDipping the cups in the sauce could make it awkward to eat, so I opted to mix the dipping sauce and filling together and then place them in the cup, creating a two bite finger food, success! One of our seasonal family birthday celebration extravaganzas was the inaugural attempt of this recipe and it was a hit. I think you will find this handy appetizer a welcome guest at your next party too.

Avocado, Cilantro, Cashew Cups

  • 1 pkg of wonton wrappers
  • 2 ripe avocados, peeled, pitted and diced – it helps to have ripe but firm avocados
  • 2 Tbsp red onion, finely chopped
  • 1 Tbsp cilantro, chopped
  • 1/4 tsp salt

Place the wonton wrappers in a mini muffin tin and press them in to the bottom and sides. Bake in a preheated 350° oven for 9 minutes or until slightly browned. Remove from oven and leave in pan until cooled. Meanwhile place the avocados, onion, cilantro and salt together in a medium bowl, being careful to keep the avocados in pieces rather than smashing. Set aside and prepare the sauce.

Sauce

  • 4 tsp white vinegar
  • 1tsp balsamic vinegar
  • 1/3 cup honey
  • juice of 1 lime

Mix these together in a microwave safe bowl for 30 seconds and stir until the honey is dissolved, set aside. In a food processor combine:

  • 1/2 cup cashews
  • 2/3 cup cilantro
  • 2 cloves of garlic
  • 2 green onions
  • 1 tsp cumin
  • 1 tsp black pepper
  • 1 tsp soy sauce
  • pinch turmeric
  • 1/4 cup olive oil, or less depending on your taste

Pulse until the cashews are chopped fine, add the vinegar honey mixture and olive oil and pulse until incorporated. Pour about half of this mixture, more or less depending on your taste, into the avocado onion mixture and stir until just mixed. Fill the cups and serve.

Makes 24 cups

Avocado, cilantro, cashew cups

This weekend finds us celebrating the winter birthdays of the family.

Cheers!

~ Susan

The Weekend Dish – Scalloped Tomatoes

By Susan Greene
The first dish we are bringing to the table from our grandmother’s recipe box is one which has also made it into the family cookbook Catherine compiled a few years back. I don’t remember the exact occasion when I first tasted this dish. It could have been at a family party or a dinner served during a weekend visit. I do remember thinking it was delicious and wanting to have it again. It is simple to prepare and yet impressive, two of my favorite qualities in a dish. Fresh tomatoes could be used in the summertime when they are readily available.

scalloped tomatoesIf you like bread, cheese and tomatoes, there’s a very good chance you will love this dish also.

minced onions

Scalloped Tomatoes

  • 1 – 1 pound can of whole tomatoes, quartered
  • 4 slices of toast or 1 1/2 cup of croutons ( I used a combination of the two, I had some leftover bread to use up, so cubed it and toasted it in the oven)
  • 1 tablespoon minced onion
  • 1/4 cup melted butter, or olive oil
  • 1 cup cubed mozzarella cheese
  • 1 cup cubed cheddar cheese
  • pinch of salt
  • 1/4 teaspoon pepper

Combine all ingredients in a 1 1/2 – 2 quart casserole dish.

scalloped tomatoes ready to bakeBake uncovered at 375° for 20 minutes.   Serves 4-5.

scalloped tomatoesThat’s all there is to it!

Here’s to warm, yummy comfort food for your weekend.

~ Susan

The Weekend Dish – Olive Cheese Balls

olive cheese ball appetizer

By Susan Greene
Lets start this weekend with a trip back to the beginning. This appetizer is an oldie but goodie. Our mother used to make them for parties in the 70’s.  I chose to copy the recipe from my mother’s recipe box when I got married and started my own recipe box some 30+ years ago. These days, the internet is my main search destination for recipe ideas and my recipe box holds the tried and true favorite recipes of my own family which I work into the rotation now and then. The olive cheese ball appetizers were forgotten until this past Christmas when they made a surprise appearance at our family celebration. Thank-you Catherine for bringing them. I am happy to become re-acquainted. The richness of the crunchy, cheesy coating is a perfect complement to the salty, tangy olives with a little heat from some cayenne pepper adding a little kick.

olive cheese ball appetizer ingredients

Olive Cheese Balls

  • 1 cup grated cheddar cheese
  • 3 Tablespoons softened butter
  • 1/2 cup flour
  • 1/2 teaspoon paprika
  • 1/4 teaspoon cayenne pepper
  • 24 stuffed olives – these can be stuffed with whatever you prefer, garlic, almonds, jalapenos or pimientos. Some stuffed olives are larger than the average pimiento stuffed ones and if you want 24 wrapped olives you will probably need to double the cheese mixture if using the larger ones.

olive cheese ball appetizer preparation

Blend the cheese and butter, using a pastry cutter, until incorporated. Stir in the flour, paprika and cayenne pepper. Drain and dry the olives (it is important to completely dry the olives for the cheese mixture to stick.) Wrap the olives with about a teaspoon or more of the mixture and spread until completely covered. Place on a lightly greased or parchment-lined cookie sheet and bake at 400°, 10-15 minutes or until lightly browned.

Note: The backyard sister also made some without olives on Christmas and they are delicious that way too.

olive cheese balls appetizersThe re-discovery of this recipe is the aha moment for launching a project we have discussed, off and on, since beginning this blog. Our grandmothers were experts at preparing some of the most delicious foods and meals. We think their recipe boxes could be veritable treasure troves of scrumptious recipes and we will be using them for recipe inspiration in the coming weeks. It is a sentimental exploration for us, from reading the mostly handwritten recipes with accompanying notes to experiencing the fond memories the dishes will most certainly evoke. Hopefully, you will find a recipe or more to add to your repertoire.

With anticipation of dishes of old being new again.

~ Susan

The Weekend Dish – Apple and Sausage Tidbits

apple and sausage tidbitsBy Susan Greene
Beginning a meal with a small bite or two of a flavorful food introducing the rest of the meal, otherwise known as an amuse bouche, is a practice I can embrace. In Europe, it is common to place an order for an apertif which is accompanied by a small portion of a tasty morsel. At home, I have gotten into the habit of enjoying a small bit of something such as a handful of nuts, small plate of cheese with crackers and/or olives or fruit, as I prepare dinner. These apple sausage tidbits are more extensive in their preparation than I use for an everyday meal, but they are an impressive treat for guests or special occasion meals.

apples and sage Start with your favorite sausage. I used hot and sweet Italian sausages. Place the sausage in a large frying pan, add a quarter cup of water and cover. Cook over medium-high heat approximately five minutes, until the sausage is firm enough to cut ( if you are using pre-cooked sausage this step can be skipped). Slice the sausage and return to the pan and continue cooking until browned.

cooking sausage bitsRemove the sausage from the pan and set aside for later. Slice one or two Granny Smith apples, or your favorite tart firm apple, into inch sized cubes. Add to the same pan with one pat of butter, a splash of brandy or sweet wine, to de-glaze the pan, and about a tablespoon or so of brown sugar and cook over medium heat stirring often until softened but still firm in the middle.

sauteeing applesAt this point, you can fry sage leaves until crisped, or not. I like the touch of green it adds to the presentation but flavor-wise they are not essential. To use the sage, add enough olive oil to the pan, after removing the apples, to cover the bottom about 1/8 inch thick. Add the sage leaves cooking for approximately 1 minute or until crisp. This process doesn’t take long. To assemble, place a sausage slice on a plate add a sage leave and top with an apple cube. You can either skewer with toothpicks now or put the toothpicks out for your guests to use. The amounts can be adjusted for the number of people you are feeding. One pound of sausage and one apple make about twenty-four bites, so you would need 24 sage leaves.The final tidbit is a wonderful mix of sweet, salty and spicy.

apple and sausage tidbitsAdd an apertif and your meal is off to a great beginning! Don’t you wonder what comes next?

Cheers~

Susan

The Weekend Dish – Maple Roasted Butternut Squash

There is something about eating seasonally that just makes sense. It’s better for the environment (no shipping produce far distances). The cost of seasonal produce is usually less because there is a relative abundance of it during it’s local season. Since shipping from other parts of the world or hothouse growing are unnecessary it has the added benefit of tasting better too. Even though we are accused of not having seasons here in California, the number of tomatoes in our garden is slowly dwindling and squash are in the markets and community gardens.

_MG_2396I find I crave seasonal foods during their season. It’s fall here and that means squash. This squash dish pairs well with many main dishes: poultry, fish, and beef for a few. The hardest part of this recipe is preparing the squash for the oven.

First, cut open the squash and scrape out the seeds.

_MG_2407Next, peel it.

_MG_2409Finally, cut into about 1-inch sized cubes.

_MG_2415 Place the cut squash on a rimmed baking sheet and add olive oil and maple syrup – I like to incorporate the oil by mixing it with my hands (after washing thoroughly of course).

_MG_2420After adding the seasonings and baking, filling your home with the smells of fall, you will be rewarded with a scrumptious, versatile side dish.

_MG_2430

Maple Roasted Butternut Squash

  • 1 medium butternut squash – seeded, peeled and cubed into 1- inch sized cubes
  • 3 Tbsp olive oil
  • 1/2 onion cut into small-medium sized pieces
  • 1/4 cup maple syrup, I like the real maple syrup
  • 2 tsp dried sage, I like sage a lot, you can adjust this to your tastes
  • salt and pepper to taste

Preheat oven to 350°.  Add squash, onion, olive oil and maple syrup to rimmed baking sheet in a single layer and stir with hands, or spoon, to coat the vegetables with the oil and syrup. Add the seasonings and stir a bit more to distribute evenly. Bake for 35-45 minutes or until squash is soft and beginning to caramelize a bit. Serves 6-8.

_MG_2432

This would make a nice Thanksgiving side also. Here’s another squash recipe from earlier this year if you are feeling like variety in your seasonal vegetables.

Bon Appetit,

~ Susan

The Weekend Dish – Split Pea Soup

_MG_2204There are some food traditions that are shared by many, turkey and stuffing on Thanksgiving and ham on Easter to name a couple, and then there are food traditions shared by families – split pea soup on Halloween is one of those in our family. Our mother began serving the traditional meal when we were little. She had the revelation while trying to come up with something quick to make ( it was usually accompanied with hot dogs), on a night when time flies by with costume preparations. Her ultimate goal: that we would have some “real food” in us before heading out trick-or-treating and eating a bagful of candy. In the early days, I remember the soup being from a can but as we got older, and needing less help from her with our costumes, she began making the soup from scratch. The meal then takes longer to prepare but the flavor boost is well worth it. Also, it can be prepared the day ahead, thus allowing the flavors to “marry”. We began looking forward to the “Halloween dinner” as much as the trick-or-treating. Then, as a young mother myself, I appreciated the relative ease of the split pea soup and hot dog Halloween dinner and have carried on the tradition with my own family. Seems like every year, at this time, I develop a craving for split pea soup. Homemade soup is my idea of warmth and love in a bowl, just the thing to take on the ghouls and goblins.

_MG_2015

Split Pea Soup

  • 1 – 16oz. package of split peas, rinsed and sorted
  • 3 quarts water, chicken broth or vegetable broth
  • 3 Tbsp olive oil
  • 1 large onion, finely chopped
  • 2 cloves of garlic chopped
  • 1/2 tsp oregano
  • 1 1/2 tsp salt, or to taste
  • 1/2 tsp pepper (I use hickory smoked pepper to give it a smoky flavor)
  • 1 bay leaf
  • 1 1/2 cups roughly chopped carrots
  • 1 C chopped celery
  • 3 medium white potatoes chopped

In a large deep pot, heat the olive oil over medium heat and saute the onions and garlic until translucent.

Add the peas, water, or broth, and seasonings. Simmer uncovered for 1 1/2 hours.

_MG_2018

Stir in the carrots, celery and potatoes ( I use my food processor to chop the carrots and celery) and simmer an additional 2 – 2 1/2 hours or until soup reaches desired thickness.

If the soup is getting too thick for your taste you can add more liquid. Adjust seasonings to suit your tastes as well.

Serves 8

_MG_2202I had some potato chips left over from a party and they make a nice garnish for adding a little crunch, or just sprinkle with cracked pepper and serve.

~ Susan

The Weekend Dish – Baked Garlic

_MG_1700Since it is October and we are getting close to Halloween, I have a delicious and vampire repelling dish for your snacking and dining pleasure, baked garlic.  When cooked, garlic mellows and even develops a slight sweetness. It makes a wonderful accompaniment to bread, meats, or use it as a spread on a sandwich or anything else you can think of, get creative. Begin by removing any loose outer skins and cut the top off of the bulbs so the cloves are open on the top.

_MG_1709Place the bulbs in a pie dish or any shallow oven-proof container. Drizzle a generous amount of olive oil over and season with salt, pepper and thyme or another herb of your choice, if you desire.

_MG_1725Cover with a lid, if your dish has one, or foil and bake in a 300° oven for 30 minutes. Remove the cover and continue baking for 45 minutes, basting occasionally with the olive oil, or until the garlic is golden brown and soft.

_MG_1731Baked garlic cloves can be served whole

_MG_1742or removed from the outer skins ( I usually squeeze it out ) and mashed.

_MG_1745It’s disease fighting properties are not to be overlooked as well.

_MG_1755The smell alone will elicit mouth watering responses. Here’s a tip, to keep you socially acceptable, eating a little parsley is an effective post garlic breath freshener.

To your health!

~ Susan

The Weekend Dish – Hot Fudge Pie

_MG_1057In the mood for baking and chocolate? I was recently; and here is something that fits both those desires perfectly. This recipe has been in our family so long I have forgotten where the original came from. It can be made with a store bought pie crust but this time I was really in the mood for baking and made mine from scratch. It has been awhile since I did this and I forgot how fun it can be plus how nice it is knowing exactly what is in the crust you are eating and being able to pronounce all the ingredients ( which isn’t very many).

I will start with the pie crust.

_MG_1028Four ingredients that’s all:

2 cups all-purpose flour
1/4 teaspoon salt
2/3 cup cold butter, I cut mine and put in freezer a short time
4 to 5 tablespoons cold water
Mix together the flour and salt in a large bowl. Cut in the butter with a pastry blender or fork until it resembles coarse crumbs.
_MG_1031Add water just enough water, with fork, to moisten the flour.
_MG_1043Divide dough in half and wrap each in plastic. Refrigerate for 2 hours to overnight.
_MG_1044Roll out a ball of the dough to fit in a 9-inch pie pan, so roll to about 12 inches.
_MG_1048Trim the edges and press around the edges with a fork, or fold the excess dough up and flute the edges.
Now for the filling:
  • 1/4 cup unsweetened cocoa powder
  • 2t flour
  • 1 cup sugar
  • 2 lg eggs
  • 2t vanilla extract
  • 1 cube butter, melted
  • 1 unbaked 9 inch pie shell

Mix cocoa, flour, and sugar in a medium bowl. Add eggs, vanilla and butter.

_MG_1051Mix well. Pour into the pie shell.

_MG_1055Bake at 350º about 25 minutes.

_MG_1170It is delicious warm, on its own or with ice cream.

_MG_1180After trying it, you will come to realize why our father nicknamed it “good-bye” pie…

_MG_1188

Dare I say it is as “easy as pie”, and sure to impress.

May your chocolate dreams come true.

~ Susan